之前在项目中遇到了Spring加载自定义xml标签的功能,然后就把这部分内容学习了一下,简单地总结一下。
总览
一般可以用XSD或者DTD文件定义xml标签,推荐XSD。通过XSD文件定义好xml标签之后,然后就可以在spring.schemas文件中指明该文件,然后就可以在xml的文件头中声明该schema,利用自己实现的handler去实现自定义xml标签的解析。
自定义xml标签
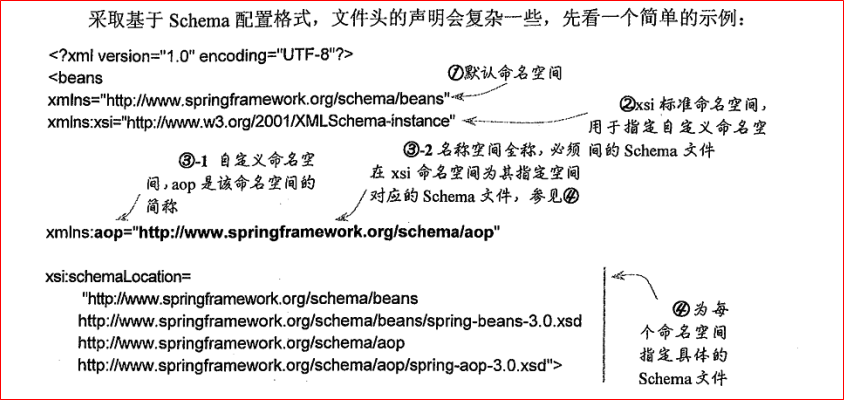
通过三个配置文件来完成自定义xml标签:spring.schemas、xsd文件和spring.handlers。我们在spring的配置文件中使用自定义xml标签的时候,需要引入相应的schema和xsd,这里就盗用一张图来解释一下:

spring.schemas文件的内容如下:
http\://www.shiliew.com/schema/test.xsd=META-INF/test.xsd
spring.handlers文件内容如下:
http\://www.shiliew.com/schema/test=com.handler.TestHandler
xsd文件如下:
<?xml version=“1.0” encoding=“UTF-8” standalone=“no”?>
<xsd:schema xmlns=“http://www.shiliew.com/schema/test”
            xmlns:xsd=“http://www.w3.org/2001/XMLSchema”
            targetNamespace=“http://www.shiliew.com/schema/test”>

    <xsd:element name=“custom” type=“customType”>
    </xsd:element>

    <xsd:complexType name=“customType”>
        <xsd:attribute name=“id” type=“xsd:ID”>
        </xsd:attribute>
        <xsd:attribute name=“name” type=“xsd:string”>
        </xsd:attribute>
    </xsd:complexType>

</xsd:schema>
Spring的配置文件如下:
<?xml version=“1.0” encoding=“UTF-8” ?>
<beans xmlns=“http://www.springframework.org/schema/beans”
       xmlns:xsi=“http://www.w3.org/2001/XMLSchema-instance”
       xmlns:test=“http://www.shiliew.com/schema/test”
       xsi:schemaLocation=“http://www.springframework.org/schema/beans
       http://www.springframework.org/schema/beans/spring-beans-2.5.xsd
       http://www.shiliew.com/schema/test http://www.shiliew.com/schema/test.xsd”>

    <test:custom id=“testBean” name=“this is a test custom tag”/>

</beans>
其实就是在xml文件头中自定义命名空间,然后在schemaLocation中指明具体的NameSpaceHandler和schema文件。spring.handlers中定义的内容指明该handler,在spring.schemas文件中定义的内容就是为了让spring在加载该schema文件时,去指定的地方获取,如上例的META-INF/test.xsd。特别注意,两者要成对出现,并且要用空格连在一起。
NameSpaceHandler
以下内容需要对spring生成bean的过程有一些了解,简单来说分三步:
-
通过资源加载器加载定义bean的资源文件,上例中Spring的配置文件也就是需要加载的资源文件;
-
解析资源文件中定义的bean,将其解析成一个spring ioc容器能够加载的通用结构BeanDefintion,上例中自定义的testBean即为一个需要加载的bean;
-
spring ioc容器遍历这些BeanDefintion,生成相应的bean。
在第二步中,因为要解析我们自定义的xml标签,因此需要我们自己实现对应的解析。我们在spring.handlers文件中指定了解析的handler,该类实现如下:
import com.bean.TestBeanDefintion;
import org.springframework.beans.factory.xml.NamespaceHandlerSupport;

public class TestHandler extends NamespaceHandlerSupport{
    @Override
    public void init() {
        registerBeanDefinitionParser(“custom”, new TestBeanDefintionParser());
    }
}
上面的代码主要是为了注册一个能解析element为custom的标签的解析器,看看上面的xsd文件定义就晓得了。然后TestBeanDefintionParser是我们自己实现的解析类,它可以将custom标签解析为一个BeanDefinition,其实现如下:
import org.springframework.beans.factory.config.BeanDefinition;
import org.springframework.beans.factory.support.RootBeanDefinition;
import org.springframework.beans.factory.xml.BeanDefinitionParser;
import org.springframework.beans.factory.xml.ParserContext;
import org.w3c.dom.Element;

public class TestBeanDefintionParser implements BeanDefinitionParser {
    @Override
    public BeanDefinition parse(Element element, ParserContext parserContext) {
        String name = element.getAttribute(“name”);
        String id = element.getAttribute(“id”);
        RootBeanDefinition root = new RootBeanDefinition();
        root.setBeanClass(Test.class);
        root.getPropertyValues().addPropertyValue(“name”, name);
        parserContext.getRegistry().registerBeanDefinition(id, root);
        return root;
    }
}
上面的代码就将spring配置中的自定义的xml标签解析为对应的BeanDefintion了,后面就由spring按照该BeanDefintion去实例化对应的bean。